Raised Patio Construction
As a complement to — or replacement for — wood decks, raised patios create functional and attractive outdoor living areas. A primary reason for building a raised patio is to allow movement from the house to the front or back yard. Sometimes this is achieved using patios that have multiple levels.
Planning
Although this article isn’t about design, that’s the start of homeowner discussions. Develop an overall plan and obtain agreement with the homeowners. Do they want to integrate landscaping? If so, where? If it is behind the wall it may affect the drainage design. How many stairs and where? How about accommodating seating, hot-tubs or fire pits? Past projects can provide design ideas for the homeowner, but establish a budget at the outset of the conversation.
A key consideration is the local building code requirements regarding elevated patios. Almost all jurisdictions require permits for projects that include raised patios and steps. Permits almost always require drawings that are typically created by the contractor and are approved by the homeowner. Therefore, the time and expense should be part of the contractor’s price.
Depending on the building codes for the project, and the measured vertical difference in elevation between patio areas, it may be necessary to install railings or other types of guards. In some areas, the building codes only require retaining walls over 48 inches tall (measured from the leveling pad to top of wall) to be designed and drawings stamped by a licensed engineer. Other areas have implemented regulations that require full engineering for retaining walls with heights as low as 24 inches.
Generally, segmental retaining walls built to a height equal to or less than twice the depth of the segmental retaining wall (SRW) unit should be stable. When the height of the wall reaches three times the depth of the SRW unit, it is prudent to include geogrid reinforcement to stabilize the wall and the retained soil. The inclusion of geogrids allows SRWs to be built to greater heights.
Determining the type, length and elevation of the geogrid layers required to construct a stable wall typically requires engineering skills. However, a conservative preliminary design can be used for initial costing of a project. At a later stage in the design phase, an engineer can review the initial design and adjust the plan as needed. A conservative initial design may incorporate geogrid, placed in continuous layers every 12 to 24 inches vertically with a length equal to the height of the wall and not less than 4 feet long. This conservative design would only be usable for typical installations: backfilled with compacted, dense-graded aggregate, pedestrian-only loading behind the wall with no slope, constructed on a stable undisturbed subgrade to a maximum total height of 6 feet.
Project layout and site preparation
Site preparation typically includes identifying site access and staging areas; permits and approved drawings; identifying slopes and drainage; installing erosion control and containment measures; and providing protection for trees, plantings and structures.
Project layout is more than just spray painting a line on the grass to indicate the patio border. The location of all utilities and buried lines should be verified and marked by the utility location company. The main task in job layout is transferring the final design from a sheet of paper to the job site. This is done by establishing a convenient elevation benchmark; marking the extent of the excavation and patio; noting important features such as corners, curves and steps; installing offset stakes and string lines; and marking the finished elevation with stakes and marks on adjacent structures. The last step in the project layout is obtaining the owner’s approval in writing.
Material management
A typical job requires a lot of material that needs to be received on site and temporarily stored until it is needed. Most of the time the local municipality will not allow materials to be stored on the street. Planning material deliveries, storage, and backyard access become critical components to the success of the job.
Ensure that delivery trucks comply with local code requirements, and that stockpiled material is out of the way of the owner, the neighbors and construction activities. Most projects should have materials delivered as needed. If all material was delivered at the beginning of the project, the site would be overcrowded, and productivity would drop. Make provisions for the equipment storage and vehicle parking. Maintaining a clean, organized site makes a favorable impression for a company and helps earn future business.
Waterproofing
When building a raised patio, water and moisture control needs to be addressed at the beginning of the project. Typically, a minimum grade of 1.5 percent is ideal to ensure that water flows across the surface. If the slope is lower than this, the water won’t move off of the patio. For larger patio areas, surface drains may be constructed. For smaller patios, water may flow across the patio, over the top of the retaining wall, and onto the garden or patio below. The use of stabilized joint sand for pavers is appropriate for most raised patios to facilitate removing water from the area.
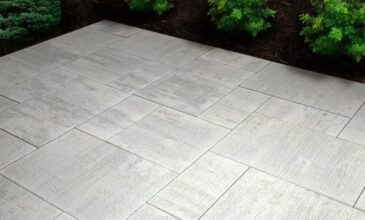
Excavation, base preparation and compaction
Before and after.
All photos courtesy of ICPI.
Raised patios built with interlocking concrete pavers and segmental concrete retaining walls units are designed as flexible systems. Accordingly, most patios are built on a firm foundation of compacted subgrade soil and a dense-graded aggregate base. Soils and base need to be compacted to a minimum of 98 percent standard proctor density. The compacted base is the structural support and leveling course for the segmental wall system. It should extend a minimum of 6 inches in front and behind the SRW unit and be a minimum of 6 inches thick. Generally, the height of SRW buried at the base of the retaining wall depends on a number of factors, the two most important being the wall height and whether the wall will have a sloped grade below. For raised patio construction, bury 6 inches of block or 10 percent of the total wall height, whichever is greater.
When constructing a raised patio, the base fill can increase the lateral load applied to the foundation wall. For buildings with basements, the weight of the additional fill can exceed the lateral capacity of the foundation wall and can cause the wall to bulge and eventually blow out into the basement and possibly cause collapse of the structure. This condition is called an unbalanced fill. Extra load is applied from the raised patio fill, but no extra resistance is provided by the foundation wall. Care should be taken when creating unbalanced fill conditions. During construction, compacting fill places additional large dynamic loads on the adjacent walls, which can potentially damage foundation walls.
A stress relief wall leaving an air gap between it and the exterior house wall is one solution. The stress relief wall is constructed like any other segmental retaining wall on a raised patio project, but the face of the wall faces the building. The air gap created needs drainage. Air circulation is necessary to minimize condensation and allow the space to thoroughly dry.
Installation
Laying the first course of segmental wall units is critical. The compacted aggregate base needs to be level and elevation verified. Levelness is checked with a laser level or transit.
Once the walls and base are installed, bedding sand is screeded like any paver project. String lines are set and the pavers installed. The concrete pavers are installed to ICPI specifications and guidelines. Although 2 percent slope is recommended for driveways, patios can be set to a minimum 1.5 percent slope to balance seating comfort and drainage away from the foundation.
A raised patio provides a perfect backdrop for any residence and for some businesses. The keys to durability are the details on foundation, drainage and waterproofing.
Article provided by the Interlocking Concrete Pavement Institute (ICPI). For more information about interlocking concrete pavement, visit www.icpi.org. For more information about segmental retaining walls, visit www.ncma.org.